What is an OBD II Scanner? and why you need one.
You are driving down the road, and “Ding” the Check Engine light pops up on your dashboard. Thoughts start running through your head… “What could it be?”, “How much is this going to cost me?”.
No need to stress, all you have to do is pull out your OBD II Scanner and see what is wrong before you get your undies in a bundle. Even your grandma can do this one.
In this post you will learn what an OBD II Scanner is, how it works, and by the end of the post you will be telling yourself you need one! So, buckle up, and let’s get to this!
Difficulty: Beginner
Estimated Time: 10-15 mins
Tools:
- OBD II Scanner Tool
What is an OBD II Scanner?
An OBD II (On-Board Diagnostics II) scanner is a diagnostic tool used to interface with the onboard computer systems of vehicles that are equipped with OBD II. OBD II is a standardized system implemented in most cars manufactured from the mid-1990s onwards.
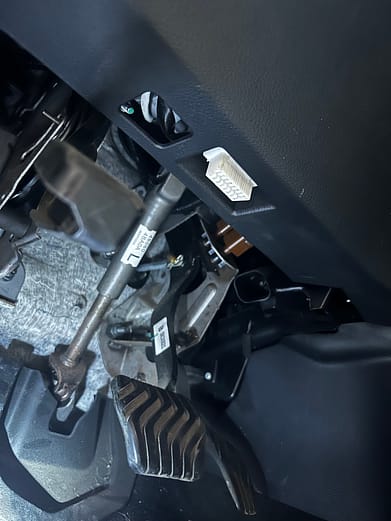
The primary purpose of an OBD II scanner is to retrieve diagnostic information from the vehicle’s computer. It connects to the OBD II port, which is typically located under the dashboard near the driver’s side. Once connected, the scanner can communicate with the car’s onboard computer and retrieve information about various systems and components.
How to Use an OBD II Scanner
Here is a straightforward, step-by-step guide on how to use an OBD II Scanner
1. Locate the OBD II Port
The OBD II port is typically located under the dashboard on the driver’s side of the vehicle. It might be covered by a plastic cap that needs to be removed before connecting the scanner.

2. Turn off the Ignition
Make sure the vehicle’s ignition is turned off before connecting the scanner. This ensures safety and prevents any potential issues.
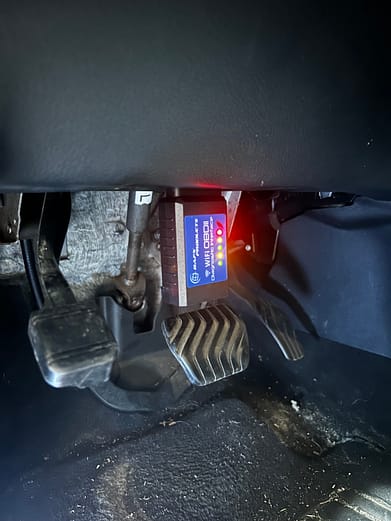
3. Connect the OBD II Scanner
Take the OBD II scanner and plug it into the OBD II port. The connector on the scanner should match the shape and size of the port, so align them properly and firmly insert the connector.

4. Turn on the Ignition
Once the scanner is connected, turn on the vehicle’s ignition without starting the engine. This will power up the scanner and allow it to communicate with the car’s computer.
NOTE: You only have to turn it to the “Accessory Position”, you don’t have to start the vehicle. Typically the instructions will request that you don’t start the engine at this point.
5. Navigate the Menu (On your phone or device)
Each OBD II Scanner tool will utilize a different program or application to navigate through the features. If your OBD II Scanner does have a screen built in, you can refer to the user manual. In the case of a Bluetooth/Wifi OBD II Scanner, you will need to download the specific app associated with it.
In the case of the OBD II Scanner mentioned above, you will need to download the OBD Fusion® app in the App Store or on Google Play


This is what the OBD Fusion® app look like on your device
6. Read Diagnostic Codes
Select the option to read diagnostic trouble codes (DTCs). The scanner will communicate with the vehicle’s computer, retrieve the codes stored in its memory, and display them on the screen. Take note of the codes, as they provide information about the specific issues detected.
7. Interpret the Codes
Use the scanner’s manual, built-in code library, or search online to interpret the DTCs. The codes consist of alphanumeric characters, with each code corresponding to a particular issue or system in the vehicle.
8. Clear the Codes (optional)
If you want to clear the diagnostic trouble codes from the vehicle’s computer, select the option to clear the codes on the scanner.
NOTE: Clearing the codes does not fix the underlying problem but simply resets the system.
9. Access Live Data (optional)
Some scanners offer the ability to access real-time data from the vehicle’s computer. This data can include parameters like engine RPM, coolant temperature, oxygen sensor readings, and more. Use the scanner’s menu to navigate to the live data section and select the desired parameters for monitoring.
NOTE: At this point, if you want to access the live data readings, you will need to start your vehicle.
10. Disconnect the Scanner
Once you have completed the scanning process and any desired operations, turn off the ignition and unplug the scanner from the OBD II port.
Additional Tips and Troubleshooting
Choose the Right Scanner: Consider your specific needs when selecting an OBD II scanner. Basic scanners are suitable for reading and clearing diagnostic trouble codes (DTCs), while more advanced models offer additional features like live data streaming, graphing, and advanced diagnostics. Ensure that the scanner is compatible with your vehicle’s make and model.
Check for Updates: Manufacturers may release firmware or software updates for OBD II scanners to improve compatibility, add new features, or address known issues. Regularly check for updates and install them to ensure your scanner is up to date.
Research Codes and Troubleshooting: When you retrieve DTCs from the scanner, take the time to research and understand the meaning of the codes. Use reliable sources such as service manuals, online forums, or reputable automotive websites. This will give you insights into the possible causes of the issue and guide you in troubleshooting or seeking professional help.
Here are some common OBD-II (On-Board Diagnostics II) codes that you may encounter:
P0300 – Random/Multiple Cylinder Misfire Detected
P0420 – Catalyst System Efficiency Below Threshold (Bank 1)
P0171 – System Too Lean (Bank 1)
P0174 – System Too Lean (Bank 2)
P0442 – Evaporative Emission Control System Leak Detected (Small Leak)
P0455 – Evaporative Emission Control System Leak Detected (Large Leak)
P0401 – Exhaust Gas Recirculation (EGR) Flow Insufficient Detected
P0500 – Vehicle Speed Sensor (VSS) Malfunction
P0128 – Coolant Thermostat (Coolant Temperature Below Thermostat Regulating Temperature)
P0135 – O2 Sensor Heater Circuit Malfunction (Bank 1, Sensor 1)
Please note that these are just a few examples, and there are hundreds of possible OBD-II codes. It’s important to consult the specific code and the corresponding vehicle documentation or seek professional assistance for accurate diagnosis and repair.
Seek Professional Help if Needed: While an OBD II scanner can provide valuable information, it’s important to recognize your own limitations. If you encounter complex or unfamiliar codes, or if you’re unsure about the appropriate course of action, it’s best to consult a professional mechanic who has expertise in diagnosing and repairing vehicles.
Final Thoughts & Why you need an OBD II Scanner!
As you can see you really don’t have to pay a mechanic to check your trouble codes, or don’t even have to head over to AutoZone (but you certainly can!) to get your codes checked. In the end you will either find yourself being told not only what the error code is, but also the 5 other things that “could” or “should” be addressed by the shop for an upsell or you will walk out of the parts store with items you had never planned on purchasing. The point of owning this tool is to SAVE you $$$, not spend MORE of it.
Do yourself a favor and BUY A OBD II SCANNER, you will not regret it. You may only use it a few times a year, but it is one of those tools that you do not want to go without in time of need.


Thanks for the step by step – it gets tiring taking my 02 Cruze to Oreillys every time the O2 sensor decides to act up.
Good stuff. I’m gonna need one of these bad boys.
Thanks for the info. This will save me a lot of money in the future.